
Can you make crystal clear ice cubes at home? Absolutely! Making clear ice at home is surprisingly simple and a rewarding way to elevate your beverages. It’s all about slowing down the freezing process and removing impurities that cause cloudiness.
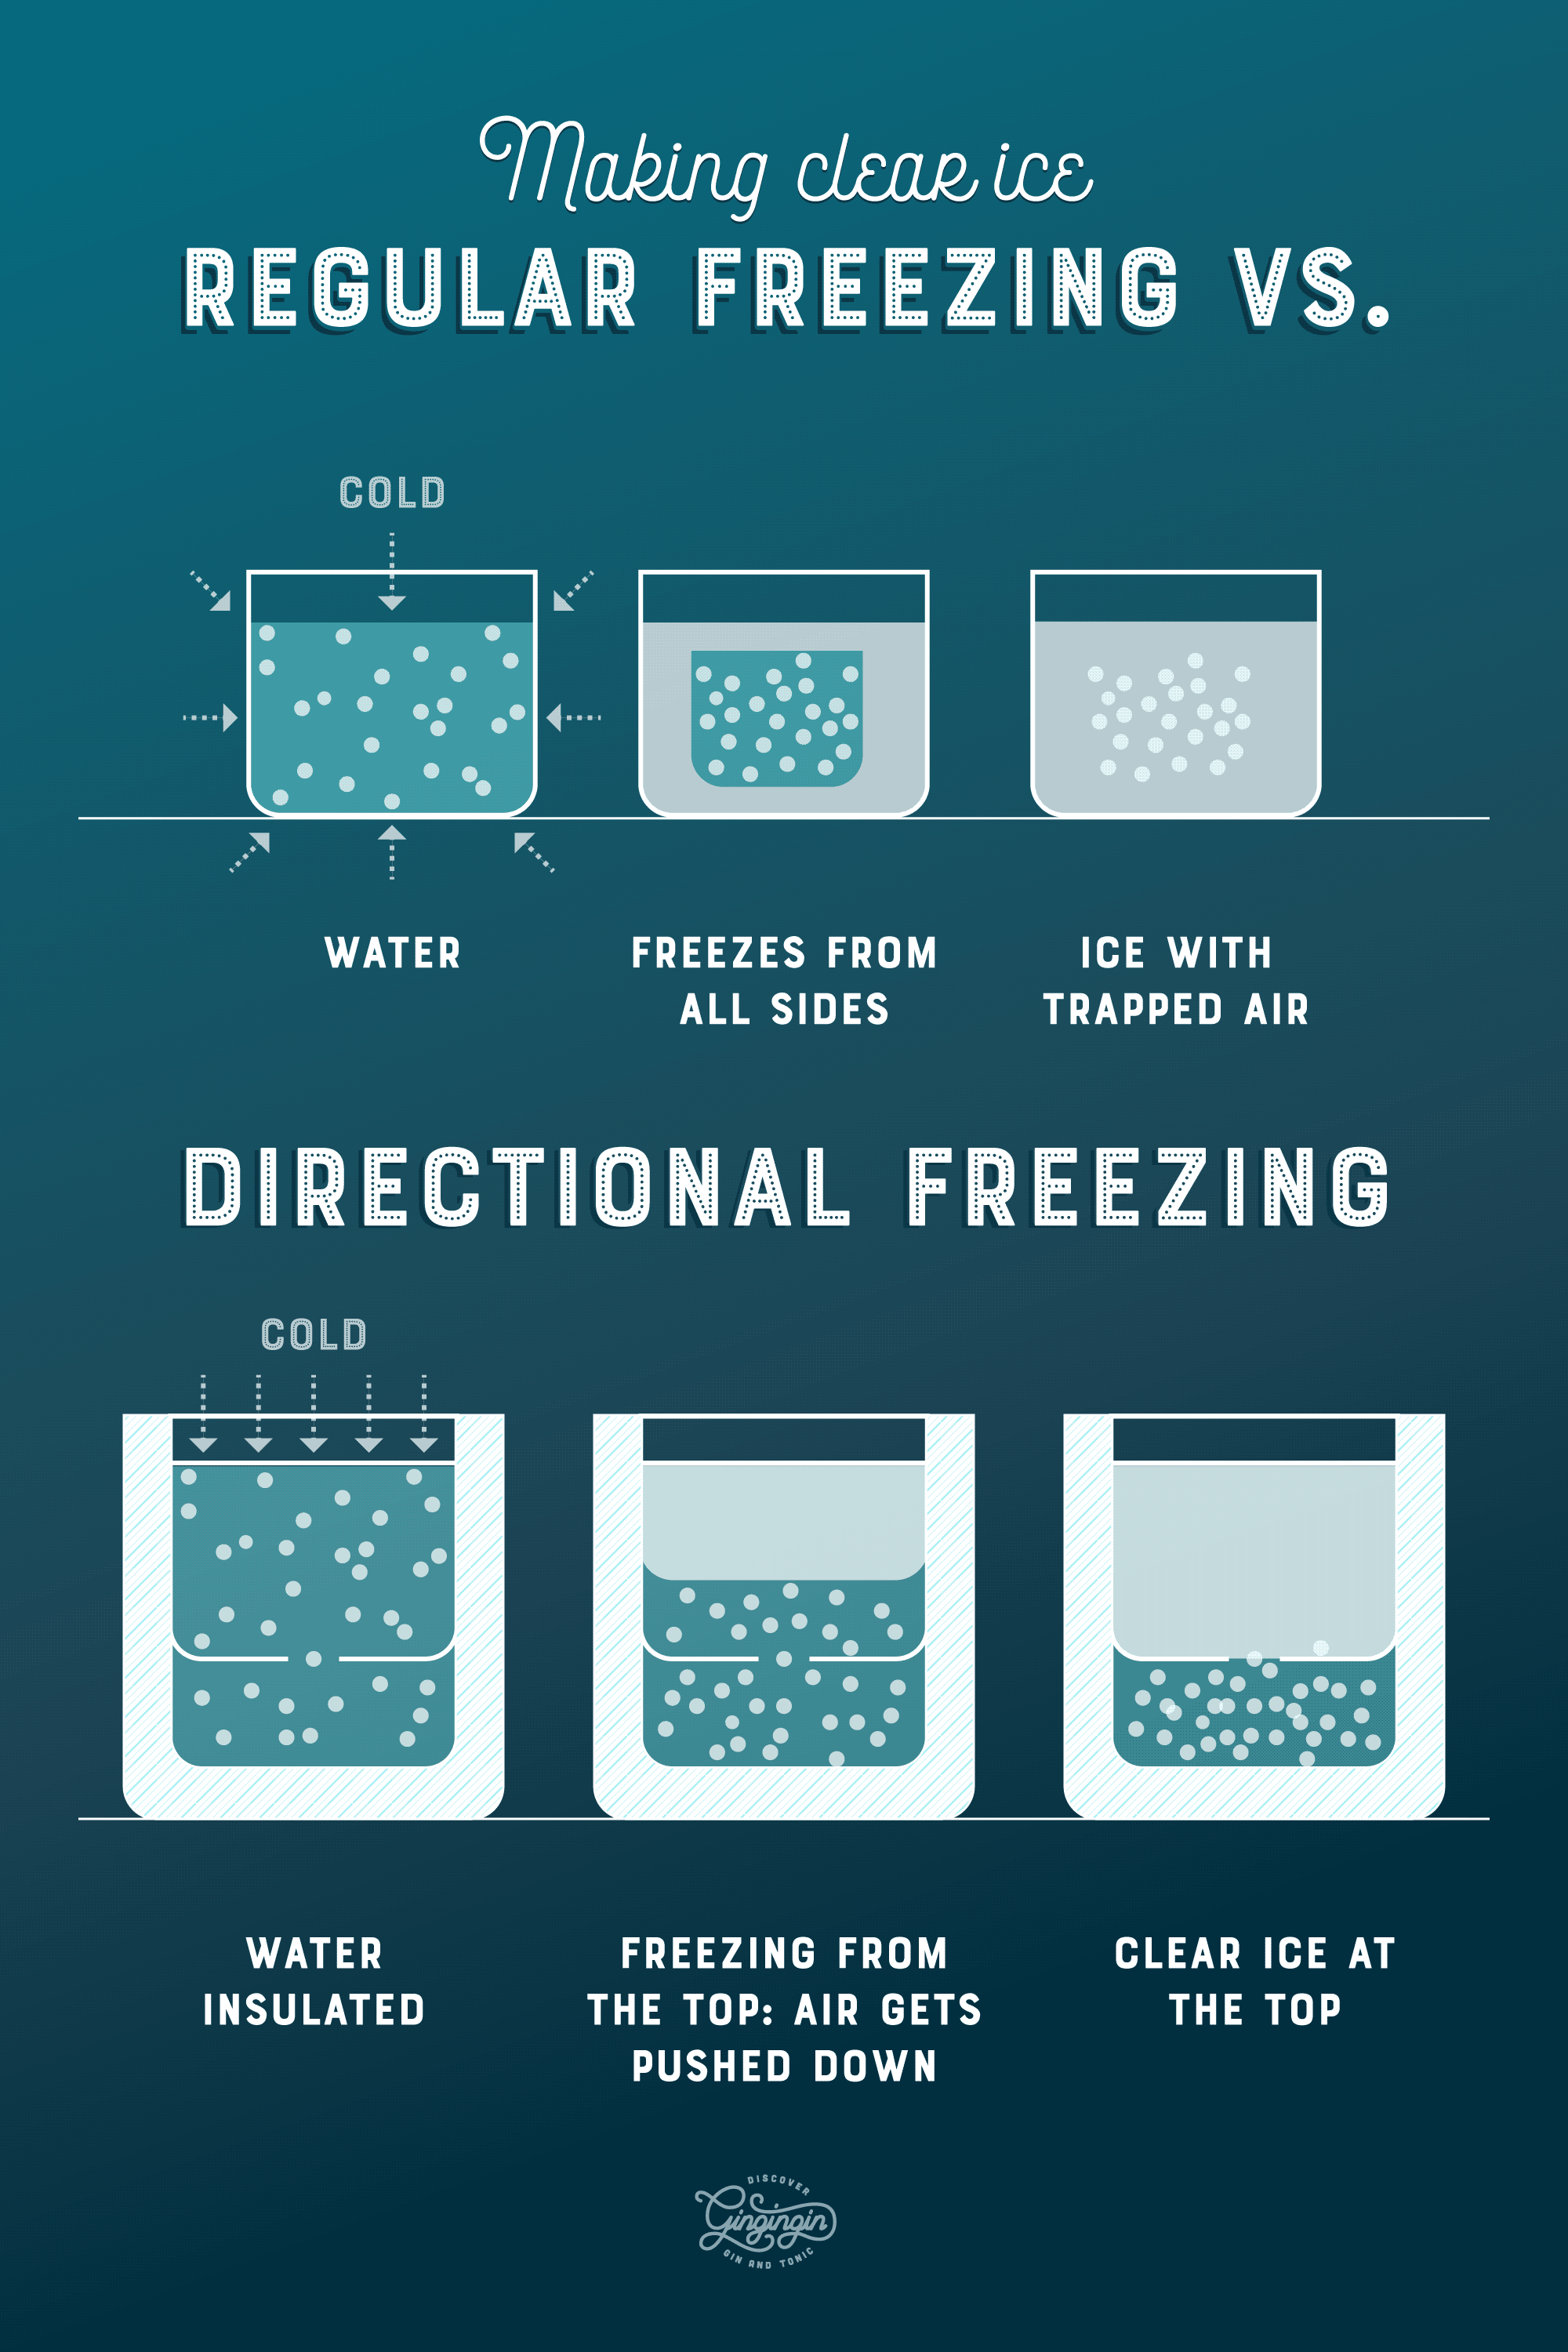
Image Source: liquorlabs.tv
Why Does Ice Get Cloudy?
Most people have noticed that the ice cubes from their freezer are often cloudy or milky. This cloudiness isn’t a sign of dirt or a problem with your water; it’s a natural consequence of how water freezes.
- Trapped Air: When water freezes, dissolved gases like oxygen and nitrogen are pushed out of the ice crystal structure. These gases get trapped as tiny bubbles, scattering light and making the ice appear cloudy.
- Impurities: Water, even filtered water, contains dissolved minerals and other solids. As water freezes, these impurities tend to concentrate in the remaining liquid water. As the freezing progresses, these concentrated impurities are also trapped, further contributing to cloudiness.
The Science Behind Clear Ice: Slow Freezing
The key to achieving crystal clear ice cubes lies in slow freezing. When water freezes slowly, it allows gases and impurities to migrate away from the freezing front, giving the water molecules more time to arrange themselves into a clear, organized crystal structure. Fast freezing, like that which occurs in most home freezers, traps these elements.
Comprehending Directional Freezing
A highly effective technique for making clear ice is directional freezing. This method involves freezing water from the top down, rather than from all sides at once.
- How it Works: By forcing the water to freeze in one direction, you can guide the trapped air and impurities to a specific area. This leaves the majority of the ice block clear.
- The Process: Imagine a freezer. Typically, the cold air circulates, and the sides of your ice tray or container freeze first. With directional freezing, we manipulate this by insulating the sides and bottom, forcing the cold to enter from the top. This pushes the impurities and air downwards.
The Best Water for Clear Ice
While you can make clear ice with various types of water, some yield better results than others.
Distilled Water vs. Filtered Water vs. Tap Water
- Tap Water: This is the most accessible but often contains the most dissolved minerals and gases, making it the most challenging to get perfectly clear ice from without specific techniques.
- Filtered Water: Using a Brita, PUR, or similar filter removes some chlorine and impurities. It’s a good starting point and generally yields clearer ice than tap water alone.
- Distilled Water: This water has had most of its minerals and impurities removed through distillation. It’s often considered the best water for clear ice because it has fewer elements to trap and scatter light. However, it can sometimes lead to ice that is too pure, which might freeze slightly differently.
- Boiled Water: Boiling water can help drive off some dissolved gases. Double boiling (boiling water, letting it cool, then boiling it again) is even more effective at removing gases. This is a crucial step for many clear ice methods.
Easy Tips for Making Clear Ice at Home
Making homemade clear ice doesn’t require fancy equipment, but a few smart strategies will dramatically improve your results.
Method 1: The Insulated Cooler Technique
This is one of the most popular and effective methods for creating large, clear ice blocks.
What You’ll Need:
- An insulated cooler (like a small picnic cooler or a Styrofoam cooler)
- Distilled water or twice-boiled tap water
- A knife or ice saw
- A freezer
Steps:
- Prepare Your Water: For the best results, use distilled water or boil your tap water twice. Let it cool to room temperature.
- Fill the Cooler: Fill the cooler with your prepared water, leaving about an inch of space at the top. You can also add flavorings or garnishes to the water if you desire, but this can sometimes affect clarity.
- The Freeze: Place the open cooler in your freezer. You want the freezer temperature to be around 0°F (-18°C) or colder.
- Monitor the Freeze: Allow the cooler to freeze for approximately 24 hours. The exact time will depend on your freezer’s temperature and the size of your cooler. You want the water to be mostly frozen, but ideally, a pool of unfrozen water will remain at the very bottom. This is where the impurities have been pushed.
- Extract the Ice:
- Carefully remove the cooler from the freezer.
- Invert the cooler onto a cutting board. The block of ice should slide out.
- If the ice block doesn’t release easily, you can run the outside of the cooler under warm water for a few seconds, or gently tap the sides.
- Separate the Clear Ice: You’ll likely see a cloudy layer at the bottom of your ice block. This is where the impurities concentrated.
- Use a sharp knife or an ice saw to carefully cut away the cloudy portion.
- The remaining ice block should be crystal clear.
- Shape Your Cubes:
- You can cut the clear ice block into cubes of your desired size. Use a serrated knife or a small saw. Be careful!
- Alternatively, you can use a clear ice mold that fits into the cooler, or place smaller silicone molds on top of the ice block once it’s out and use a hammer and chisel (with extreme caution and safety gear) to break it down into cubes.
- Store: Store your clear ice cubes in freezer bags or containers in your freezer.
Why this Works: The insulated sides and bottom of the cooler prevent the water from freezing from the sides. Freezing occurs primarily from the top down, pushing dissolved gases and impurities into the unfrozen water at the bottom.
Method 2: Using Silicone Molds and an Insulated Container
This method is great if you want smaller, more uniform cubes and don’t want to cut a large block.
What You’ll Need:
- Silicone ice cube molds (larger, spherical, or cube shapes work well)
- A plastic food storage container with a lid that’s large enough to hold your molds and has some insulation (a smaller cooler can also work)
- Distilled water or twice-boiled tap water
- A freezer
Steps:
- Prepare Your Water: Use distilled water or boil and cool your tap water twice.
- Fill the Molds: Fill your silicone molds with the prepared water.
- Arrange in Container: Place the filled silicone molds inside the plastic food storage container.
- Insulate and Freeze: Place the lid on the container. This container acts as an insulator, helping to achieve directional freezing. The idea is that the water inside the molds will freeze from the top down.
- Freezing Time: Freeze for 18-24 hours, or until the ice is mostly solid in the molds. You might still have a small amount of unfrozen water at the very bottom of the molds if you used a very well-insulated container.
- Demold: Once frozen, remove the silicone molds from the container and pop out the ice cubes.
- Clean Up Cloudy Cubes: You might notice that the very bottom of your cubes is slightly cloudy. If so, you can briefly run these cubes under warm water to melt away the cloudy layer, or use a knife to carefully shave it off.
- Store: Store your clear ice cubes in freezer bags.
Tips for this Method:
- Using a container with a snug-fitting lid helps prevent freezer burn.
- Ensure the molds aren’t touching the sides or bottom of the container if possible, to encourage freezing from the top.
Method 3: The Simple Boil and Freeze (for smaller batches)
This method is less effective than the insulated cooler but can improve the clarity of ice made in standard ice cube trays.
What You’ll Need:
- Standard ice cube trays (silicone or plastic)
- Distilled water or twice-boiled tap water
- A saucepan
- A freezer
Steps:
- Boil Your Water: Boil your tap water. For best results, boil it, let it cool, then boil it again (double boiling).
- Cool the Water: Let the boiled water cool to room temperature. This helps remove dissolved gases that cause cloudiness.
- Fill Trays: Fill your ice cube trays with the cooled, boiled water.
- Freeze: Place the trays in your freezer.
- The Result: While this method won’t produce perfectly clear ice like the cooler method, you should see a noticeable improvement in clarity compared to using plain tap water. The cubes might still have some cloudiness, especially in the center or bottom.
Advanced Techniques and Considerations
Using a Clear Ice Mold
Specialized clear ice molds are designed to facilitate directional freezing. These often consist of a two-part system: an outer container and an inner mold.
- How They Work: You typically fill the outer container with water. The inner mold is placed inside, pushing the water up and around it. The insulation is built into the design, forcing freezing from the top down around the inner mold, or from the outside inward, channeling impurities away.
- Benefits: They are convenient and designed for the purpose, often yielding excellent results with minimal effort once you grasp the concept.
The Importance of Freezer Temperature
Your freezer’s temperature plays a crucial role.
- Colder is Better: A colder freezer (0°F / -18°C or below) will freeze water more quickly, which can be counterproductive for clear ice. However, a very cold freezer can also help the initial freezing process in the insulated cooler method. The key is controlling how it freezes.
- Consistent Temperature: Fluctuations in temperature can also impact the freezing process. Ensure your freezer is set to a consistent temperature.
Freezing Time Considerations
The slow freezing aspect is critical.
- Don’t Rush: Rushing the process by placing warmer water in a very cold freezer will still trap air.
- Patience: Allow ample time for the water to freeze slowly and for impurities to migrate. 24 hours is a good starting point for the cooler method.
Troubleshooting Common Issues
| Problem | Possible Cause | Solution |
|---|---|---|
| Ice is still cloudy | Insufficient boiling; Impurities not fully displaced | Use distilled water, ensure double boiling, or extend freezing time for the cooler method. |
| Cloudiness at the top | Freezing from sides or bottom; Air trapped at surface | Ensure the cooler is well-insulated; focus on top-down freezing; try a different mold or container. |
| Ice cracks easily | Rapid temperature changes; Impurities not fully removed | Handle ice gently; ensure slow freezing; try boiling water again. |
| Cloudiness in the center | Water didn’t freeze slowly enough; Impurities migrated | Extend freezing time; ensure adequate insulation for directional freezing. |
| Ice has an “off” taste/smell | Cooler material or contaminants | Use food-grade coolers/containers; clean them thoroughly; ensure no residual cleaning product odors are present. |
| Difficult to cut ice block | Block is too hard; Dull knife | Let the block temper slightly at room temperature for a few minutes; use a sharp, serrated knife or ice saw. |
Frequently Asked Questions (FAQ)
Q1: Do I really need distilled water?
While distilled water often yields the clearest results, you can make good clear ice with filtered or even twice-boiled tap water. The goal is to reduce dissolved gases and impurities.
Q2: How long does it take to make clear ice?
For the insulated cooler method, plan for about 24 hours of freezing time. Smaller molds might take 18-24 hours. The crucial factor is slow freezing.
Q3: Can I add fruit or herbs to my clear ice?
Yes, you can! However, adding ingredients can introduce small particles and affect the clarity. For the clearest ice, freeze plain water. If you do add ingredients, consider placing them strategically so they don’t interfere with the main freezing block.
Q4: My ice block is too hard to cut. What do I do?
Let the ice block sit at room temperature for 5-15 minutes before attempting to cut it. This slightly softens the outer layer, making it easier to saw or slice without shattering. Always use a sharp tool.
Q5: Is clear ice stronger than cloudy ice?
Clear ice is generally more dense and pure, meaning it can be stronger and melt slower than cloudy ice, which contains more air pockets and trapped impurities. This makes it ideal for cocktails that you don’t want watered down quickly.
Q6: Can I use my regular ice cube trays?
Yes, but you’ll get much clearer ice if you use the boiling water technique (double boiling is best) and potentially insulate the trays themselves. However, standard trays are designed for fast freezing, which inherently traps air and impurities. For truly clear ice, specialized molds or the cooler method are superior.
Making homemade clear ice is a simple science experiment you can enjoy at home. By focusing on slow freezing and directional freezing techniques, and using the best water for clear ice, you can transform your drinks with beautifully clear, slow-melting cubes. Experiment with different methods and water types to find what works best for your freezer and your preferences!