
How To Clean A Night Guard At Home: Hygienic Care
Yes, you can effectively clean your night guard at home using simple methods. Maintaining proper dental appliance hygiene is crucial for preventing bacteria buildup and ensuring your night guard lasts longer. This guide will walk you through the best practices for night guard care, including mouthguard cleaning, and even covers retainers cleaning as many principles overlap. Whether you’re dealing with a custom-fit guard or a more generic cleaning dental trays scenario, these tips will help keep your oral appliance fresh and clean.
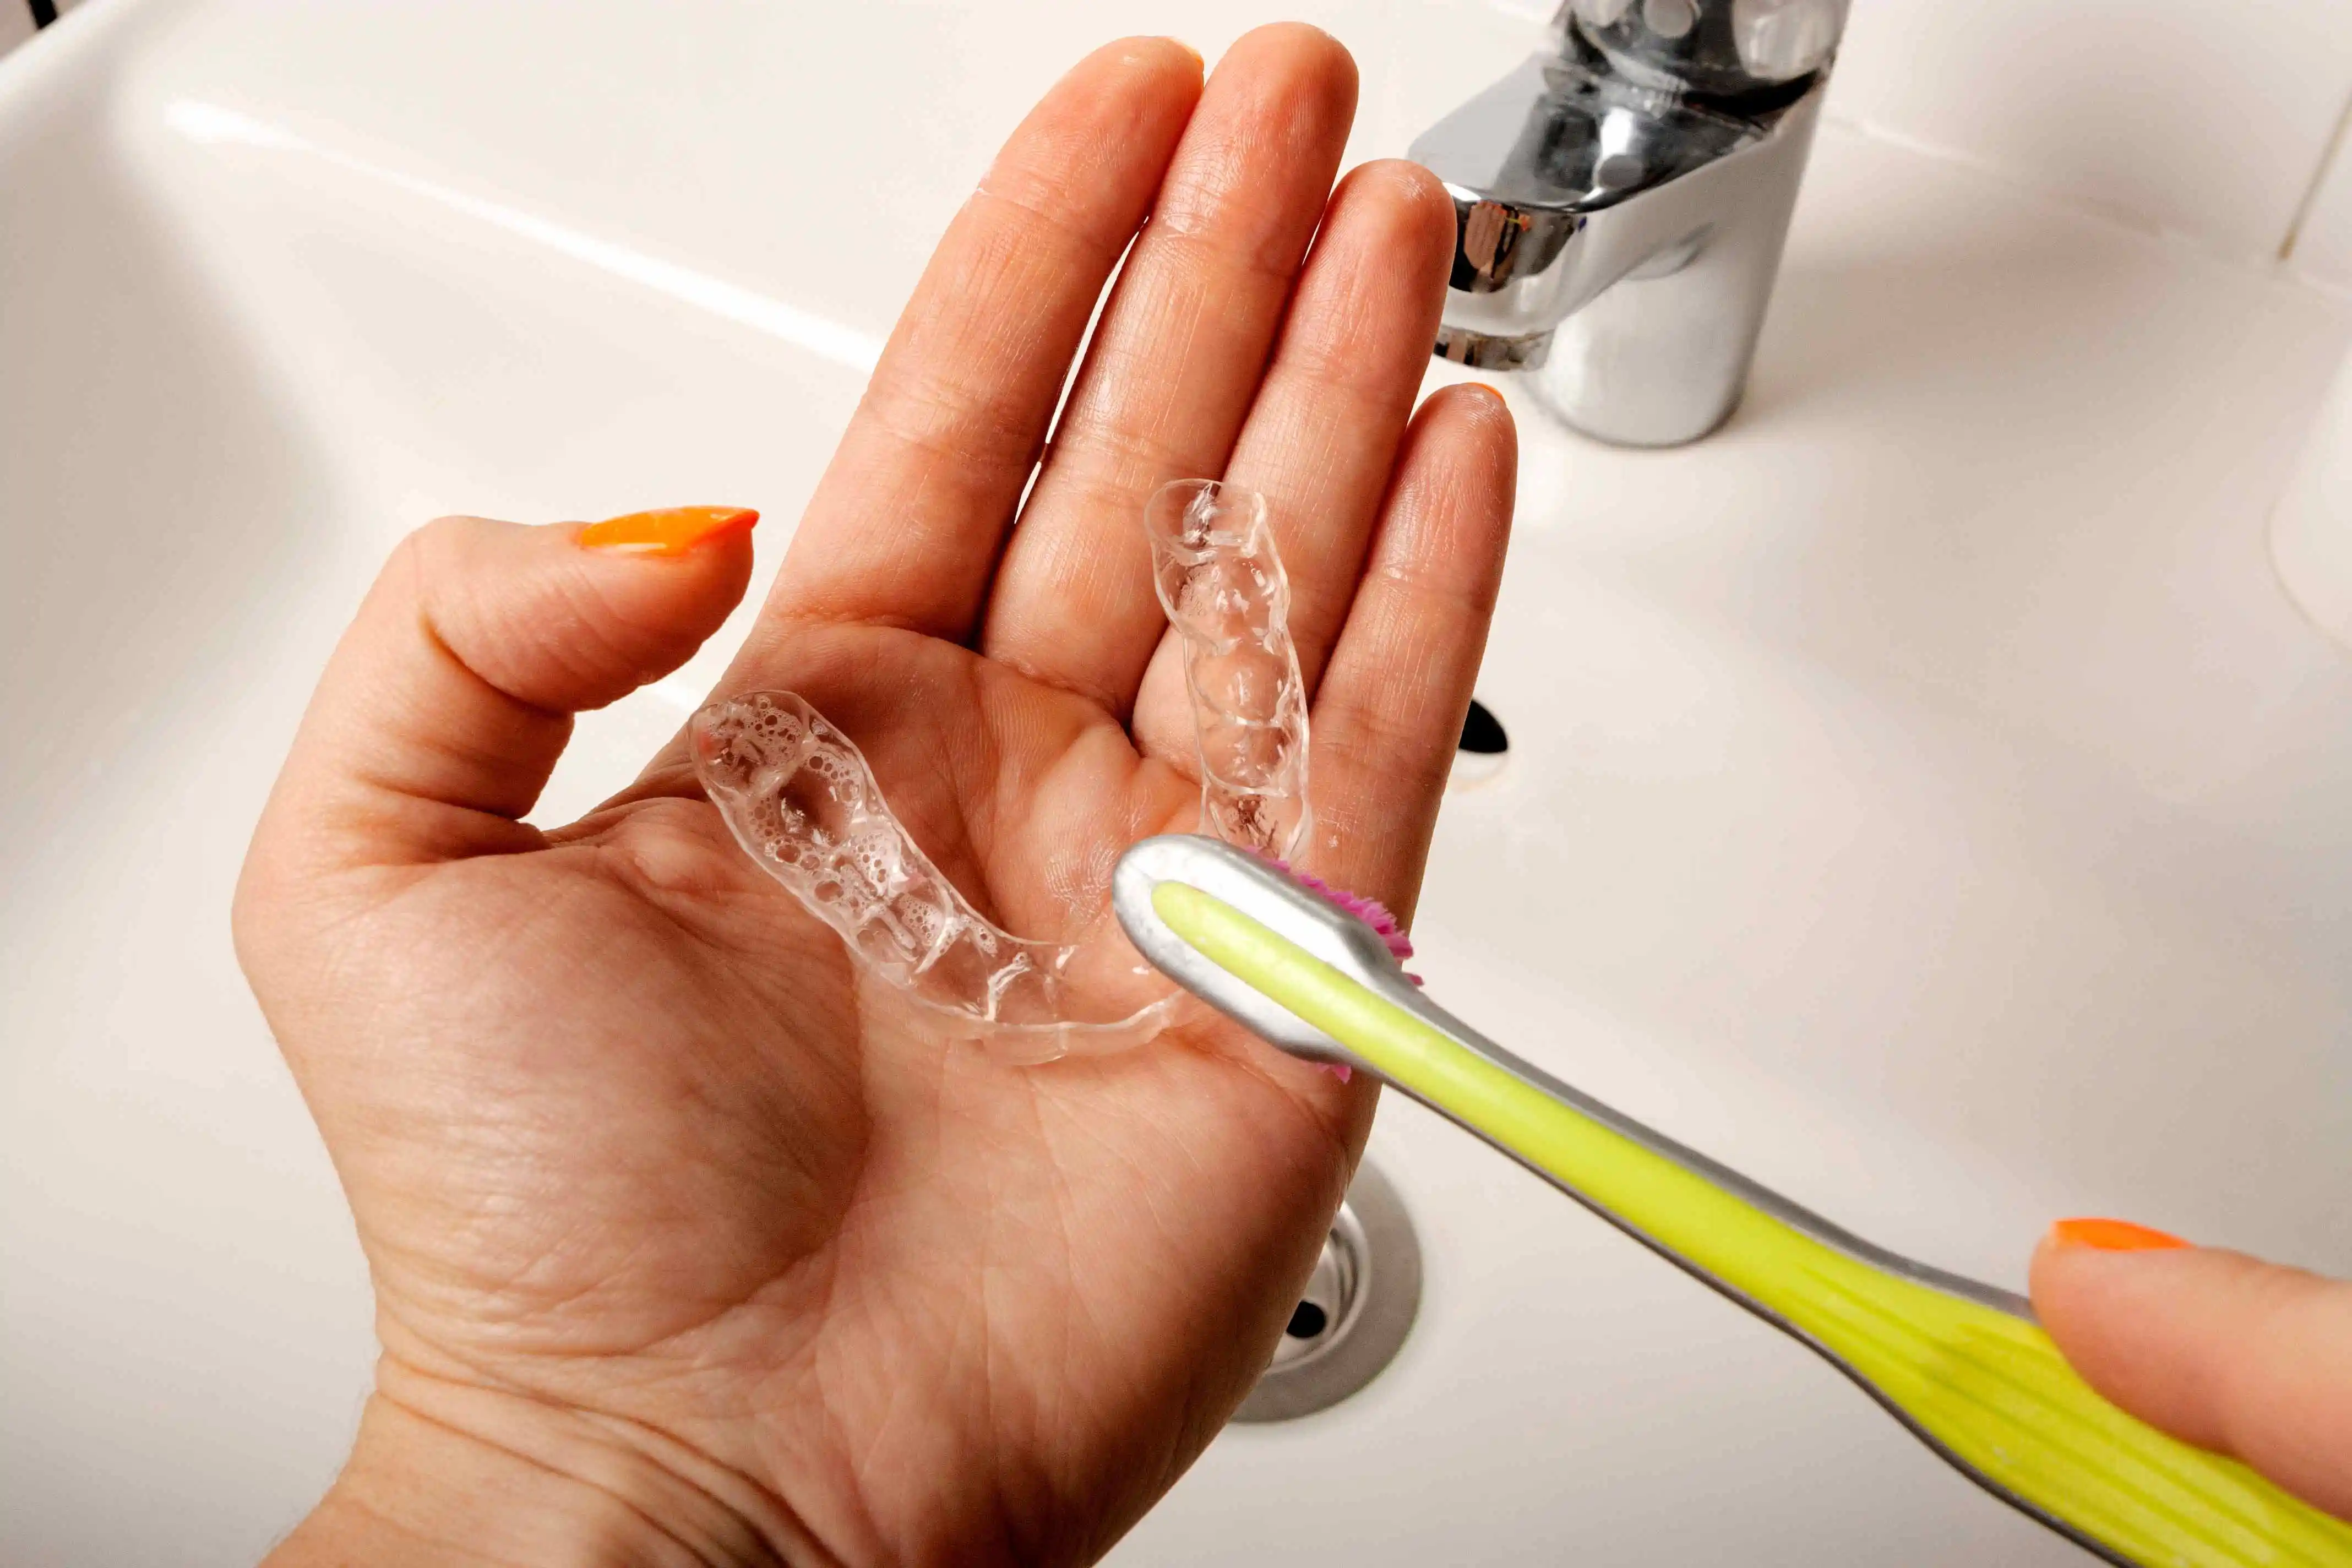
Image Source: riversbendfamilydental.com
The Importance of a Clean Night Guard
Your night guard is in constant contact with your mouth for several hours each night. During this time, it can accumulate saliva, bacteria, food particles, and even fungi. Without regular cleaning, these can lead to:
- Bad breath: Bacteria and decaying food particles are a primary cause of halitosis.
- Tooth decay and gum disease: The persistent presence of harmful bacteria can contribute to oral health problems.
- Staining and discoloration: Saliva can mineralize, leading to yellow or brown stains on your night guard.
- Mold and mildew growth: A damp environment is ideal for mold, which is unpleasant and potentially harmful.
- Shortened lifespan of your night guard: Buildup can degrade the material over time, requiring premature replacement.
Therefore, diligent night guard care isn’t just about aesthetics; it’s about protecting your oral health and the investment you’ve made in your dental appliance.
Daily Cleaning Routine: The Foundation of Good Hygiene
A simple daily cleaning routine is the most effective way to prevent significant buildup. This should be done every morning after you remove your night guard.
What You’ll Need:
- Soft-bristled toothbrush (dedicated to your night guard)
- Mild, non-abrasive liquid soap or a specialized night guard cleaner
- Lukewarm water
Steps for Daily Cleaning:
- Rinse Thoroughly: Immediately after taking out your night guard, rinse it under cool, running water. This helps remove loose debris and saliva.
- Gentle Brushing: Using your dedicated soft-bristled toothbrush, gently brush the entire surface of your night guard. Pay attention to any crevices or areas where it fits snugly. Use a small amount of mild liquid soap or a cleanser specifically designed for mouthguards.
- Avoid toothpaste: Toothpaste is often abrasive and can scratch the surface of your night guard, creating microscopic pits where bacteria can hide and grow. It can also wear down the material, reducing its effectiveness and lifespan.
- Avoid hot water: Hot water can warp or deform many types of night guards, especially those made from softer acrylics or thermoplastic materials. Always use lukewarm or cool water.
- Rinse Again: Thoroughly rinse the night guard under cool water to remove all traces of soap or cleaner.
- Air Dry: Allow the night guard to air dry completely before storing it in its case. Do not place it back in your mouth while it’s still wet, as this can encourage bacterial growth.
This daily ritual is fundamental to mouthguard cleaning and is as important as retainers cleaning. It prevents the accumulation of materials that can lead to odors and infections.
Weekly Deep Cleaning: For a Truly Sanitized Guard
While daily cleaning is essential, a weekly deep clean will ensure your night guard remains as hygienic as possible. This often involves soaking. The goal here is to sanitize night guard and effectively disinfect night guard components that daily brushing might miss.
Method 1: Soaking with Denture Cleansers
Denture cleaning tablets are readily available and highly effective for cleaning night guards. They are formulated to kill bacteria and remove stains without damaging the appliance.
What You’ll Need:
- A clean container or cup
- A denture cleaning tablet (follow package instructions for mixing with water)
- Lukewarm water
Steps for Soaking:
- Prepare the Solution: Fill the clean container with lukewarm water. Add one denture cleaning tablet.
- Soak the Night Guard: Place your night guard into the solution. Ensure it is fully submerged.
- Soaking Time: Allow the night guard to soak for the duration recommended on the denture cleaner packaging, typically 15-30 minutes. Do not leave it to soak overnight unless the product specifically states it’s safe to do so, as prolonged exposure to certain chemicals can degrade the material.
- Rinse Thoroughly: After soaking, remove the night guard and rinse it thoroughly under cool, running water. Ensure no residue from the cleaning tablet remains.
- Brush (Optional but Recommended): You can give the night guard a quick brush with your dedicated toothbrush after soaking to ensure any loosened debris is removed.
- Air Dry: As with daily cleaning, allow the night guard to air dry completely before storing.
This soaking method is a powerful way to disinfect night guard surfaces and is a cornerstone of good dental appliance hygiene.
Method 2: Soaking with White Vinegar (Home Remedy)
White vinegar is a natural disinfectant and deodorizer. It can be a great home remedy for night guard cleaning when used correctly.
What You’ll Need:
- A clean container or cup
- Equal parts white vinegar and lukewarm water
- Lukewarm water for rinsing
Steps for Soaking with Vinegar:
- Prepare the Solution: Mix equal parts white vinegar and lukewarm water in your clean container.
- Soak the Night Guard: Submerge your night guard in the vinegar and water solution.
- Soaking Time: Let the night guard soak for about 20-30 minutes. The acidity of the vinegar helps break down mineral deposits and kill bacteria.
- Rinse Thoroughly: Remove the night guard from the solution and rinse it very well under cool, running water. It’s crucial to remove all vinegar residue, as its strong smell and taste can linger and be unpleasant.
- Brush (Optional): A light brush with your soft-bristled toothbrush can help remove any remaining particles.
- Air Dry: Allow the night guard to air dry completely.
While vinegar is a good option, some find the smell or taste can be difficult to completely eradicate. If this is the case, opt for specialized cleaners or denture tablets.
Method 3: Soaking with Baking Soda (Home Remedy)
Baking soda is a mild abrasive and a natural deodorizer, making it another effective home remedy for night guard cleaning.
What You’ll Need:
- A clean container or cup
- 1-2 tablespoons of baking soda
- Lukewarm water
Steps for Soaking with Baking Soda:
- Prepare the Solution: In your clean container, add 1-2 tablespoons of baking soda. Gradually add enough lukewarm water to dissolve the baking soda, creating a paste or a milky solution.
- Soak the Night Guard: Submerge your night guard in the baking soda solution.
- Soaking Time: Allow it to soak for approximately 20-30 minutes.
- Rinse Thoroughly: Remove the night guard and rinse it exceptionally well under cool, running water.
- Brush: Gently brush the night guard with your soft-bristled toothbrush to remove any residual baking soda.
- Air Dry: Ensure the night guard is completely dry before storing.
Baking soda is generally gentle and less likely to leave a lingering taste than vinegar, making it a popular choice for cleaning dental trays and night guards.
Advanced Cleaning and Maintenance Tips
Beyond regular cleaning, consider these additional tips for optimal night guard care.
Cleaning Stubborn Stains or Odors
If you notice stubborn stains or persistent odors that daily and weekly cleaning don’t address, you might need to step up your game.
- Hydrogen Peroxide Soak: Mix one part 3% hydrogen peroxide with one part water. Soak your night guard in this solution for about 30 minutes. Hydrogen peroxide is an excellent disinfectant and can help lift stains. Rinse thoroughly afterward.
- Specialized Night Guard Cleaners: Many dental supply stores and pharmacies offer specialized cleaning solutions for night guards and retainers. These are often more potent than household remedies and formulated specifically for the materials used in these devices.
Proper Storage is Key
How you store your night guard is just as important as how you clean it.
- Use the Case: Always store your night guard in the clean, dry case provided with it. This protects it from dust, debris, and damage.
- Ensure Dryness: Never store your night guard while it’s still damp. This creates a breeding ground for bacteria and mold. Allow it to air dry completely before placing it in its case.
- Ventilation: Ensure the case has adequate ventilation. If it’s a solid plastic case, leaving the lid slightly ajar for a short period after cleaning can help.
When to Replace Your Night Guard
Even with the best night guard care, these appliances have a limited lifespan.
- Visible Wear: Look for signs of wear and tear, such as thinning, rough edges, cracks, or damage to the fit.
- Persistent Odors: If you can’t eliminate odors despite regular cleaning, it might be time for a replacement.
- Changes in Fit: If your night guard no longer fits snugly or comfortably, it may be worn out and less effective.
- Damage: Any significant cracks or breaks mean the guard should be replaced immediately to prevent injury.
A general guideline is to replace your night guard every 1-3 years, depending on the material, how often you wear it, and how well you maintain it. Consult your dentist for personalized advice on replacement timing.
What NOT to Do When Cleaning Your Night Guard
Avoiding certain practices is as crucial as following the right ones.
- Do not use boiling water: As mentioned, hot water can warp the material.
- Do not use abrasive cleaners: Avoid scouring powders, stiff-bristled brushes, or harsh chemicals like bleach, as they can damage the night guard and compromise its integrity.
- Do not use mouthwash for soaking: Many mouthwashes contain alcohol or other ingredients that can break down the plastic over time. While a quick rinse with some types might be acceptable, prolonged soaking is generally not recommended.
- Do not share your night guard: This is a critical point for dental appliance hygiene. Sharing a night guard can transfer bacteria and viruses between individuals, posing significant health risks.
Frequently Asked Questions About Night Guard Cleaning
Here are some common questions people have about keeping their night guards clean:
Q1: Can I use regular toothpaste to brush my night guard?
A1: No, it is strongly advised against using regular toothpaste. Toothpaste contains abrasives that can scratch the surface of your night guard, creating tiny crevices where bacteria can hide and multiply. This can also make the guard appear dull or cloudy over time and reduce its lifespan. Always opt for a mild, non-abrasive soap or a specialized cleaner.
Q2: How often should I soak my night guard?
A2: Soaking your night guard at least once a week is recommended for thorough cleaning and to sanitize night guard surfaces effectively. If you notice any signs of staining or odor, you might need to soak it more frequently.
Q3: My night guard smells bad. What can I do?
A3: A bad odor usually indicates bacterial buildup. Ensure you are performing your daily cleaning routine diligently. For persistent odors, try soaking your night guard in a solution of denture cleaner or a mixture of equal parts white vinegar and lukewarm water for about 20-30 minutes. Always rinse thoroughly afterward and allow it to air dry completely.
Q4: Can I use my retainer cleaning solution for my night guard?
A4: Yes, in most cases, you can. The principles of retainers cleaning and mouthguard cleaning are very similar. Many specialized retainer cleaners are suitable for night guards, as they are formulated to be gentle yet effective against plaque and bacteria. Always check the product label for compatibility.
Q5: What if my night guard feels sticky even after cleaning?
A5: A sticky feeling can be due to mineral deposits from saliva or inadequate rinsing. Ensure you are using lukewarm water for rinsing and that all cleaning agents are completely washed away. A gentle scrub with a soft toothbrush after soaking can also help remove any sticky residue. If the problem persists, consider using a different cleaning method or consulting your dentist.
Q6: Is it safe to use antibacterial mouthwash to soak my night guard?
A6: It is generally not recommended to soak your night guard in antibacterial mouthwash. While it seems like a good idea, the alcohol content in many mouthwashes can degrade the plastic material of the night guard over time, making it brittle or causing it to warp. Stick to dedicated cleaners, denture tablets, or gentle home remedies like vinegar or baking soda for soaking. A quick rinse with some types of mouthwash might be acceptable, but always verify with your dentist.
Q7: How do I know if my night guard is clean?
A7: A clean night guard should be free from visible debris, stains, and any unpleasant odors. It should look clear or the original color of the material without any cloudiness or discoloration from buildup. After proper cleaning and rinsing, it should feel smooth and not sticky.
By following these detailed instructions and maintaining a consistent cleaning regimen, you can ensure your night guard remains hygienic, effective, and lasts for its intended lifespan, contributing positively to your overall oral health and well-being. Proper dental appliance hygiene is a small effort for a significant return in comfort and health.