
Image Source: fairfaxcryobank.com
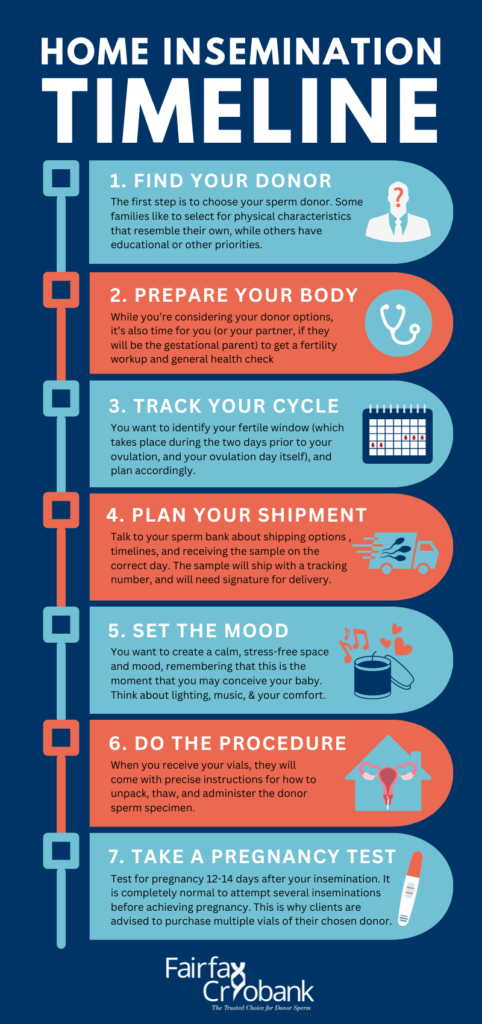
How To Do At Home Insemination Safely: Your Step-by-Step Guide
Can I do insemination at home? Yes, you can attempt at-home insemination safely by following precise steps and using sterile equipment. What is at-home insemination? At-home insemination, also known as home artificial insemination or self-insemination process, is a method where a person attempts to get pregnant without sexual intercourse. It involves placing sperm directly into the reproductive tract. This guide will walk you through the at-home conception journey, focusing on safety and effectiveness. Whether you’re using donor sperm insemination home methods or a partner’s sample, this information is designed to empower you with knowledge for a successful pregnancy at home.
Deciphering At-Home Insemination: What It Is and Why Consider It
At-home insemination is a fertility treatment that can be performed in the comfort of your own home. It involves collecting a sperm sample and then using a simple tool, like a syringe, to introduce the sperm into the vaginal canal or cervix. This method offers privacy, cost-effectiveness compared to clinic-based treatments, and can be a viable option for various fertility journeys.
Why People Choose At-Home Insemination:
- Privacy and Comfort: Many individuals and couples prefer the familiarity and privacy of their own home environment for conception attempts.
- Cost Savings: Compared to in-vitro fertilization (IVF) or even intra-uterine insemination (IUI) performed at a fertility clinic, at-home insemination is significantly more affordable.
- Control and Autonomy: It gives individuals more control over their fertility journey, allowing them to manage timing and procedures themselves.
- Single Parenthood: It’s a common method for single individuals or same-sex couples using donor sperm to conceive.
- Intimacy Preservation: For couples, it can be a way to maintain intimacy and avoid the clinical nature of some fertility treatments.
Who Is At-Home Insemination For?
At-home insemination can be a suitable option for individuals or couples experiencing:
- Unexplained Infertility: When no specific cause for infertility has been identified.
- Mild Male Factor Infertility: When sperm count, motility, or morphology are slightly below optimal levels.
- Cervical Factors: When cervical mucus is hostile to sperm or the cervix itself poses a barrier.
- Same-Sex Couples: A common method for lesbian couples using donor sperm.
- Single Women: Using donor sperm to conceive.
- Couples with Religious or Personal Objections to IVF: When other options like IVF are not preferred.
It is crucial to consult with a healthcare professional before starting at-home insemination, especially if you have known fertility issues, as they can advise on the best approach for your specific situation.
Preparing for Your At-Home Insemination Journey
Success in at-home fertility treatments hinges on meticulous preparation. This involves understanding your cycle, gathering the right supplies, and creating a conducive environment.
Understanding Your Ovulation Cycle
The most critical factor for successful conception is timing. At-home insemination is most effective when performed during a woman’s fertile window, which is the period leading up to and including ovulation.
Methods to Track Ovulation:
- Ovulation Predictor Kits (OPKs): These kits detect the surge of luteinizing hormone (LH) in urine, which typically occurs 24-36 hours before ovulation. Using an ovulation kit insemination is a widely recommended practice.
- How to Use: Begin testing your urine daily a few days before you expect to ovulate. Follow the kit’s instructions carefully. A positive result indicates ovulation is imminent.
- Basal Body Temperature (BBT) Charting: This involves taking your temperature first thing every morning before getting out of bed. A slight, sustained rise in BBT (around 0.5-1°F or 0.3-0.5°C) indicates that ovulation has occurred. While BBT confirms ovulation, it’s less useful for predicting it in advance compared to OPKs.
- Cervical Mucus Monitoring: As ovulation approaches, cervical mucus typically becomes clear, stretchy, and resembles raw egg whites. This fertile-quality mucus helps sperm travel.
Key Takeaway: Combining OPKs with cervical mucus monitoring can provide a highly accurate picture of your fertile window.
Essential Supplies for At-Home Insemination
Ensuring you have the right sterile equipment is paramount for safe and effective sperm insemination at home.
What You’ll Need:
- Sperm Sample Collection Container: A sterile, wide-mouthed container. If using a partner’s sample, it should be collected directly into this container. If using donor sperm, it will likely come in a specialized collection vial from a sperm bank.
- Syringe: A syringe insemination at home typically uses a disposable, sterile oral syringe or a syringe specifically designed for insemination, often with a soft catheter tip. Avoid needles.
- Sterile Lubricant (Optional but Recommended): Some lubricants can harm sperm. If needed, opt for sperm-friendly lubricants. However, it’s best to avoid lubricants if possible.
- Clean Towels or Wipes: For hygiene.
- Gloves (Optional): For added hygiene.
- A Clean, Quiet Space: To perform the procedure comfortably.
Crucial Note on Sterility: All equipment that comes into contact with the sperm or reproductive tract must be sterile to prevent infection. Do not reuse disposable items.
Preparing the Sperm Sample
Proper handling of the sperm sample is vital for its viability.
Best Practices for Sample Handling:
- Collection Time: Ideally, the sperm sample should be used within one hour of collection to maintain sperm motility.
- Temperature: Keep the sample at body temperature. Do not refrigerate or freeze it unless you are using a cryopreserved donor sample from a bank.
- Avoid Contamination: Ensure the collection container is clean and sterile. If collecting at home, the donor should wash their hands and genitals thoroughly before collection.
- Donor Sperm: If using donor sperm insemination home services, follow the specific thawing and handling instructions provided by the sperm bank meticulously. These instructions are critical for the viability of the sample.
The Step-by-Step Guide to At-Home Insemination
Performing DIY insemination requires attention to detail and a calm approach. Follow these steps for a safe and effective procedure.
Step 1: Timely Collection of the Sperm Sample
- Partner Collection: The male partner should collect the sample through masturbation. It’s recommended to abstain from ejaculation for 2-5 days prior to collection for optimal sperm count.
- Donor Sperm: If using donor sperm, you will receive it from a sperm bank, either fresh or frozen. Frozen sperm must be thawed according to the sperm bank’s instructions precisely before use. This usually involves thawing it in a sterile container at body temperature.
Step 2: Preparing for the Insemination
- Hygiene: Wash your hands thoroughly with soap and water. If using a partner, they should also wash their hands and genitals.
- Positioning: Lie down on a flat surface. Some find it comfortable to elevate their hips with pillows, which may help the sperm travel towards the cervix.
- Prepare the Syringe:
- If using a partner’s fresh sample, draw the sperm into the sterile syringe. Ensure you get as much of the ejaculate as possible.
- If using donor sperm, draw the thawed and prepared sample into the syringe.
Step 3: Performing the Insemination
This is the core of the self-insemination process.
- Insertion: Gently insert the tip of the syringe into the vagina. Aim towards the cervix, which is typically located at the back of the vaginal canal.
- Depress the Plunger: Slowly and steadily push the plunger to release the sperm into the vagina. Try to distribute it as evenly as possible.
- Withdrawal: Gently withdraw the syringe.
Step 4: Post-Insemination Care
- Remain Lying Down: Stay lying down for at least 15-30 minutes after the insemination. This allows gravity to assist the sperm in reaching the cervix and potentially entering the uterus.
- Avoid Douching or Rinsing: Do not wash out the vagina immediately after insemination, as this can wash away the sperm.
Timing Your Insemination for Maximum Effectiveness
The success of at-home conception is heavily dependent on timing your insemination with ovulation.
The Fertile Window:
The fertile window is the period during the menstrual cycle when pregnancy is possible. This includes the five days leading up to ovulation and the day of ovulation itself. Sperm can live in the female reproductive tract for up to 5 days, while the egg is viable for about 12-24 hours after ovulation.
Optimal Timing with Ovulation Kits:
When using an ovulation kit insemination, the best time to inseminate is typically 12-24 hours after a positive LH surge.
- First Positive OPK: If you get a positive result on your OPK, this signals that ovulation is likely to occur within the next 24-36 hours. You might consider inseminating on this day.
- Second Positive OPK (Optional): Some people choose to inseminate twice during their fertile window for increased chances. This might involve inseminating on the day of the first positive OPK and again 24 hours later, or on the day you observe fertile cervical mucus.
Recommendations for Timing:
- Daily Testing: Continue using OPKs daily until you get a positive result.
- Inseminate Sooner Rather Than Later: Once you have a positive OPK, aim to inseminate within 24 hours.
- Consider Multiple Inseminations: For a given cycle, inseminating 1-2 times during the fertile window can improve the chances of success.
Important Considerations for Safety and Success
While at-home insemination is relatively straightforward, prioritizing safety is crucial.
Hygiene is Paramount
Infection is a primary risk associated with any invasive procedure, even at home.
- Sterile Equipment: Always use sterile, single-use syringes and collection containers. Do not reuse items.
- Hand Washing: Meticulous handwashing before and after the procedure is essential.
- Donor Hygiene: If using a partner’s sample, ensure they practice good hygiene during collection.
Sperm Quality and Viability
The quality of the sperm directly impacts the chances of pregnancy at home.
- Lifestyle Factors (Partner): For partners providing sperm, a healthy lifestyle can improve sperm quality. This includes a balanced diet, avoiding smoking and excessive alcohol, managing stress, and maintaining a healthy weight.
- Donor Sperm Banks: Reputable donor sperm banks screen donors rigorously for infectious diseases and genetic conditions, and they process and store sperm to maximize viability.
Legal and Ethical Aspects
If you are using donor sperm, it’s important to consider the legal and ethical implications, especially regarding donor anonymity and rights.
- Sperm Bank Agreements: Donor sperm purchased from licensed sperm banks usually comes with legal agreements outlining parental rights and responsibilities.
- Known Donors: If using a known donor (friend or family member), it is highly recommended to have a legal agreement drafted by a lawyer to clarify intentions and responsibilities before conception.
When to Seek Professional Help
While at-home insemination is a viable option, it’s not always successful and professional medical advice is sometimes necessary.
- Persistent Difficulty: If you have been trying at-home insemination for several months (typically 6-12 cycles) without success, it’s advisable to consult a fertility specialist.
- Underlying Fertility Issues: If you or your partner have a diagnosed fertility issue (e.g., PCOS, endometriosis, severe male factor infertility), clinic-based treatments like IUI or IVF might be more appropriate.
- Questions or Concerns: Always feel comfortable discussing any questions or concerns about the process with your doctor or a fertility counselor.
Using Donor Sperm for At-Home Insemination
Donor sperm insemination home is a common pathway to parenthood for many individuals and couples. The process is similar to using a partner’s sample but involves specific considerations regarding the sperm source.
Choosing a Sperm Bank
- Reputation and Screening: Select a reputable sperm bank known for thorough donor screening, including infectious disease testing and genetic analysis.
- Donor Profiles: Sperm banks provide detailed donor profiles, which can include physical characteristics, medical history, education, and sometimes even personality traits or hobbies.
- Types of Sperm: You can choose between fresh or frozen donor sperm. Frozen sperm is more commonly used for at-home insemination as it is readily available and has been screened.
Handling Frozen Donor Sperm
- Thawing Process: Follow the sperm bank’s instructions precisely. Frozen sperm typically needs to be thawed in a sterile container at body temperature. Do not use a microwave or hot water, as extreme heat can damage sperm.
- Delivery: Sperm banks typically ship frozen sperm in special dry shippers that maintain a specific temperature for a set period. Ensure you are available to receive the shipment and follow the storage instructions.
Syringe Insemination at Home with Donor Sperm
Once the frozen sperm is thawed correctly, the syringe insemination at home process is as described earlier:
- Ensure all equipment is sterile.
- Wash hands thoroughly.
- Draw the thawed sperm into a sterile syringe.
- Gently insert the syringe into the vagina and release the sperm towards the cervix.
- Remain lying down for 15-30 minutes.
Common Scenarios and How to Address Them
Navigating the path to pregnancy can sometimes present challenges. Here’s how to address common issues in at-home fertility.
Scenario: What if the Sperm Sample is Small?
- Explanation: The volume of ejaculate can vary. The critical factor is the number of motile sperm.
- Action: Even a small volume can be effective if it contains enough healthy sperm. Use the syringe to draw up all the collected ejaculate and proceed with insemination as usual.
Scenario: What if I Can’t Get the Sperm into the Syringe Easily?
- Explanation: Sometimes, the semen can be viscous.
- Action: Ensure the collection container is sterile. You can gently swirl the container to help liquefy the semen if it seems too thick, but avoid excessive agitation. If using a partner’s sample, collecting it after a warm shower might help it liquefy faster.
Scenario: What if I Miss the Fertile Window?
- Explanation: Misjudging ovulation timing is common.
- Action: Don’t get discouraged. Track your cycle diligently in the next month using ovulation kits and cervical mucus monitoring. Proper timing is key to success.
Scenario: What if the Syringe Leaks or Doesn’t Work Properly?
- Explanation: Equipment can occasionally malfunction.
- Action: Always have a backup sterile syringe available. If a syringe is faulty, discard it safely and use a new one.
Frequently Asked Questions (FAQ) about At-Home Insemination
Here are answers to some common questions regarding DIY insemination and at-home conception.
- Q: How many times should I do at-home insemination per cycle?
- A: It is generally recommended to inseminate once or twice during your fertile window. Timing it 12-24 hours after a positive ovulation predictor kit (OPK) is a common strategy. Some people opt for two inseminations: one on the day of the first positive OPK and another 24-48 hours later.
- Q: What is the success rate of at-home insemination?
- A: Success rates vary widely depending on factors like age, fertility health, sperm quality, and precise timing. Generally, the success rate per cycle is estimated to be around 10-20%.
- Q: Can I use regular lubricant with sperm?
- A: No. Many common lubricants can harm sperm motility. If lubrication is necessary, use a sperm-friendly lubricant or a small amount of sterile saline solution. It’s often best to avoid lubricants altogether if possible.
- Q: How long should I lie down after insemination?
- A: Staying lying down for at least 15 to 30 minutes is recommended to allow gravity to help the sperm travel towards the cervix.
- Q: Can I have intercourse after insemination?
- A: While having intercourse is generally not discouraged after insemination, some suggest avoiding it for a few hours to allow the sperm placed via insemination to settle. However, the primary goal is to get the sperm into the reproductive tract.
- Q: What are the risks of at-home insemination?
- A: The main risks are infection due to unsterile equipment or improper technique. When done with sterile supplies and good hygiene, the risks are minimal.
- Q: Can I use a cup to collect sperm for at-home insemination?
- A: Yes, a sterile, wide-mouthed cup is suitable for collecting semen. The key is that it must be sterile and used promptly.
- Q: How soon can I take a pregnancy test?
- A: It is best to wait until you miss your period, or at least 12-14 days after insemination, to take a pregnancy test for the most accurate results.
By carefully following these guidelines, individuals and couples can undertake the process of at-home insemination with greater confidence and safety, increasing their chances of achieving a successful pregnancy at home.